How to Remove the Background from an Image

Cutting out the background from an image can be time-consuming and fiddly, especially if there’s a lot going on in it. Fortunately, there are a number of tools to make the job quick and easy and some of them don’t even require a download! Want to learn how to remove a background from an image?
We also have guides on how to create a watermark and how to make an animated GIF, if you’re looking for additional tutorials related to photography.
Background Burner
So let’s say you want to Photoshop a mustache onto your coworker’s face or tweak an image you found online, but you don’t have access to Photoshop and all of the mustaches you find feature an annoying background. In order to strip out the background and get a PNG file, which will allow you to isolate your image and save it without any background content, follow these steps:
Step 1: Download and save the image in question to your computer.
Step 2: Head over to the official Background Burner website.

Step 3: Click the blue “Choose a photo” button in the bottom-right corner, or simply drag and drop your image into the box labeled “Drag and Drop Image Here.”
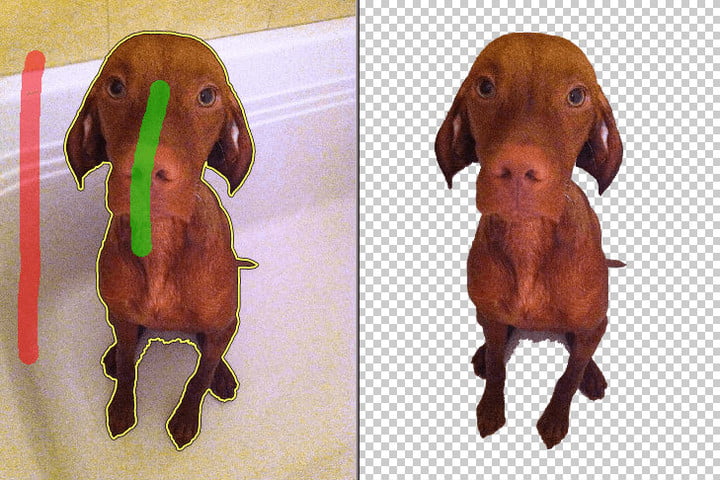
Step 4: Now, watch as the tiny dragon eradicates the background of your image. The tool does a pretty precise job with basic backgrounds, but if you want to make additional changes, click the “Touch up” button below the resulting image. Then, use the Mark Foreground and Mark Background tools to define the parts of the image you’d like to remove.

Step 5: Once the image preview on the right-hand side of the page looks correct, click the green “Log in to download” button. You’ll need to create a free account in order to download the resulting image, but doing so is easy, especially if you allow the site access to your Facebook or Google credentials.
Removing complex backgrounds
Looking to remove the background from an actual photograph, not just some clip art with a white background? Don’t worry — Background Burner can handle that, too. To get the job done, simply follow the steps as outlined above, but be a little bit more precise when marking up your image. For example, the picture below is pretty good, but the background doesn’t quite fit. We want to replace it with something a bit more impactful.
To begin removing the background, follow steps one through three in the previous section and allow the dragon to do its job. As you can see below, the tool’s edge-finding algorithm did a decent job of finding the model and provided us with four options to choose from.

We chose the one that left most of his body intact but nixed the grill and various partygoers. If you’re happy with the initial results, simply click the green “Select” button. If not, click “Touch up” and fine-tune your image. Using the first image as our outline, we started painting green lines on the parts of the image we wanted to be restored.

To make it more accurate, we needed to zoom in and get more precise with our markings. You can change the size of your brush in the top menu, but we’ve found that’s it’s far easier to zoom in. Once you’re close enough to see where the algorithm missed the edges, drop a few green marks to encapsulate the part of the image you’d like to keep. Once done, zoom out to see if the finished product looks OK. Ours isn’t perfect, but it’ll do. Now, do the same with the red brush (aka, the Mark Background tool).

When you’re happy with your product, click “Use This” in the bottom-right corner. Again, you’ll need to create a free account in order to download the resulting image, but doing so is easy if you allow the site access to your Facebook or Google credentials.

Now we can add a newer, more appropriate background…

Perfect! Keep in mind that there is also a professional version of Background Burner — one that’s specifically focused on ecommerce — if you plan to remove image backgrounds on a regular basis or need access to more advanced tools. Oh, and if you’re interested in augmenting a sweet profile image like this, we’ve rounded up a collection of the best selfie apps.
Use Clipping Magic for more detail

If you want to explore a more detail-oriented option, check out this alternative to Background Burner: Clipping Magic. Like the aforementioned tool, it uses automated software to detect edges — all you have to do is mark the “foreground” and “background” with red and green strokes.
Clipping Magic also provides a useful live preview, which lets you tweak the results on the fly. The web app provides basic options for shadow and color adjustment, too, along with a couple other tools that allow you to better adjust the resulting image. This makes the software more suitable for detailed projects, ones in which you want more control over how your image looks.
Adobe Photoshop for the experts
Photoshop is a pretty amazing program, and with such a massive selection of tools, the program offers a number of different ways to strip backgrounds from images. It isn’t the cheapest, but there is always the free trial you can take advantage of. We’ll start with the easiest method, which works well if you’re dealing with a neutral, solid, or otherwise basic background.
Step 1: Open the image in Photoshop.
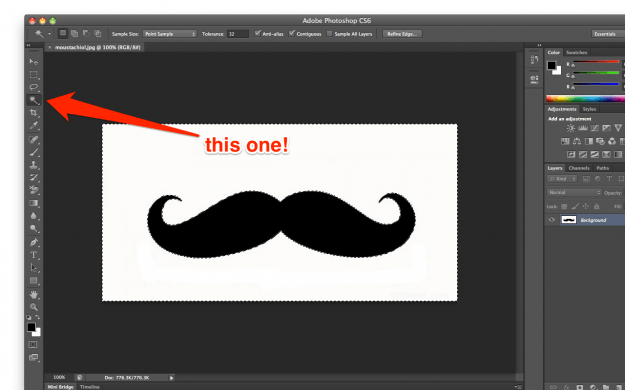
Step 2: Select the Magic Wand/Lasso tool, the latter of which is great for customizing your selection.

Step 3: Click the background and hit the Delete button, which will cause the background to disappear.
Step 4: Save your new image as a PNG.
To strip away a more complex background in Photoshop, you’ll need to dig a bit deeper into your toolbox. Photoshop is a fully-featured program, and as such, it supplies you with a myriad of different ways to remove backgrounds. Some of these methods carry far steeper learning curves than others, so for this tutorial, we’ll go over a method that’s fairly straightforward. Here’s how it’s done:
Step 1: Open your photo in Photoshop.
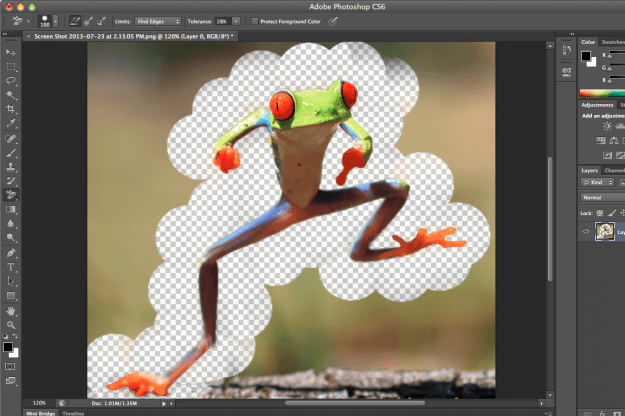
Step 2: Select the Background Eraser tool.

Step 3: Adjust the brush size to your liking and set the Sampling to “Continuous.”
Step 4: Set the Limits to “Find Edges” and adjust the Tolerance. Lower is generally better since a high setting will remove more colors. It’s generally a safe bet to opt for a setting in the 20-30 range.
Step 5: Hover over an area of the background that’s near your object. Now, simply click and it will be removed.
Step 6: Continue this process until you’ve created a background-free border around your entire object. Feel free to adjust the tolerance as needed where your image gets lighter/darker around the edges.

Step 7: Once you’ve created a solid border around your object, switch to the Eraser tool and remove the rest of the background.
The Magic Wand and Lasso methods work great, namely because many photo-editing programs have borrowed the look and feel of these highlighting tools for their own removal tools. So, even if you’re using freemium software like Pixlr — or other tools highlighted in our roundup of the best free photo-editing software — knowledge of these tools can carry over.


