
How to Record Your Computer Screen
Whether you’re a gamer setting up your own YouTube channel or an entrepreneur attempting to create a video of your latest project, you’ll probably have moments where you think, “I wish I could record that!” While many of today’s computers come pre-equipped with microphones and webcams, they don’t always come with options for easily recording your computer or phone’s display at a moment’s notice — that is, unless you know where to look.
More guides and best-ofs
Best screen recorders
How to take a screenshot on a PC
Best free video-editing software
Let’s go over how to record your computer screen on your own terms, whether you want to do so using a free program you already own or an app that’s chock-full of powerful tools aimed at professional productions.
Recording your screen in Windows 10
If you would rather not download any additional software, there’s a good chance that some of the apps you have laying around can already record your screen, even if that’s not their primary purpose. Here are several apps that you probably have access to right now, and how they can record for you.
PowerPoint

Didn’t know you could record your screen with PowerPoint? It’s true — the latest versions of PowerPoint include that feature. Here’s how to do it, step-by-step:
Step 1: Head to the “Insert” tab, and select “Screen Recording.”
Step 2: Click “Select Area” to choose the specific area of your screen you want to record. If you want to record the entire screen, press the Windows Key, Shift and “F.”
Step 3: Click the “record” button,” or press the Windows key, Shift and “R.”
When you’re done you can save the video as a separate file to access or embed as you see fit. Editing and control options are very limited after that, but it’s a great option for quick-and-dirty recording — especially if you’re doing it for a looming presentation. And don’t ignore the video enhancement tools that PowerPoint offers, such as changing the video’s shape, adding a border, and adding effects like shadows, glow, and more.
YouTube Live Streaming
If you don’t want to spend a ton of time recording but still want a video for your YouTube channel, or any other compatible social media platform, then YouTube can help out.
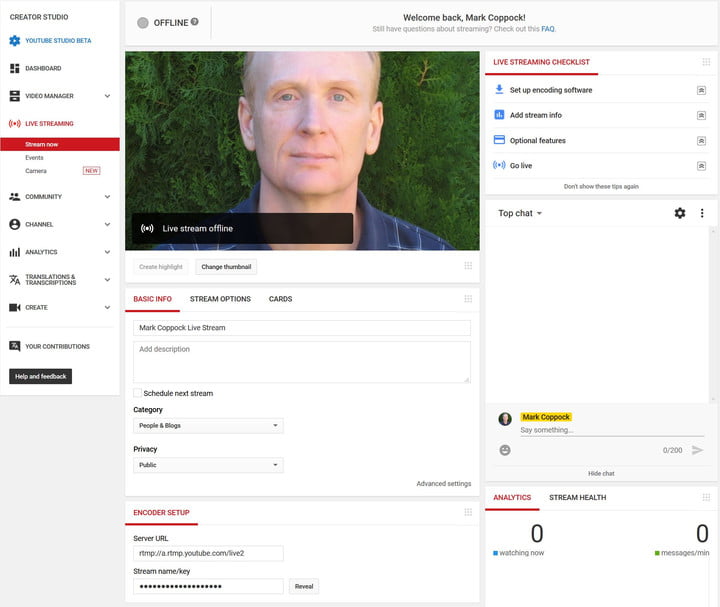
Step 1: Sign into your account as you would normally, using Google’s Chrome browser. Click on your account icon and select “Creator Studio.”
Step 2: Choose “Events” under Live Streaming, and choose “Enable live streaming” if necessary (if you haven’t created your YouTube Channel yet, this will start the process for you). Then select “New live event.”

Step 3: Fill out the required information, and choose either “Quick” or “Custom” for the type of video you want. Custom allows you to choose more coding options for your recording, while Quick immediately opens a streaming window. Note that Quick currently uses Google Hangouts on Air to launch, but since Google is phasing out Hangouts this option may change in the future. When you are ready to begin, click “Go Live Now.”
Step 4: On the left, you should see a button that says “Screenshare.” Select it, and choose a desktop window for recording.
Step 5: Click “Start Screenshare” followed by “Start Broadcast.” You should now be recording!
Step 6: Select “Stop Broadcast” when finished, and save your Event as you wish.
For a more detailed guide to YouTube streaming for gaming Let’s Plays, check out our full guide. Alternatively, if you want to record yourself, Chrome has some quick-recording features now.
Alternative offline apps for professional work
If you want an enhanced recording experience from an app specifically designed for more professional — and gaming-oriented — clips, then your best bet is to download one of the apps below.
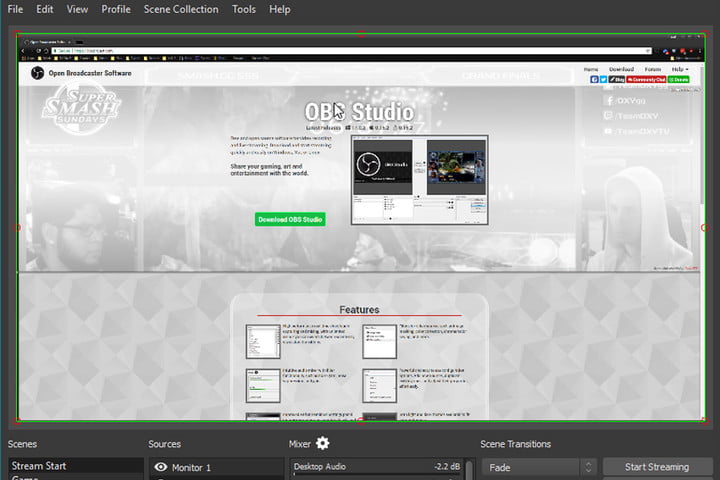
OBS Studio (free): One of the more advanced freely available screen-recording apps out there, OBS Studio is entirely open source and allows unlimited full-screen recording without watermarks. It has built-in streaming functions for those who want to have a live audience while recording and has great hardware support, so 60 FPS recording is perfectly feasible. It’s more full-featured than some freemium apps, and it can take a little longer to set up your personal preferences because of that. However, it’s still the best of the free screen-recording apps out there today.
Snagit ($50): Snagit is designed more for start-ups than gamers, with a ton of recording features made for showing off products and creating your own marketing videos, how-to features, vlogs, and so on. If you are planning an elaborate video that includes several types of video and multiple graphics as well as screen recording, Snagit is a great choice for simpler needs. It does cost $50, but if you don’t mind paying for the privilege, the added features are worth it.
Recording your screen in MacOS
QuickTime Player

If you’re running an older version of MacOS, you can always use the QuickTime Player for basic screen recording (as well as audio recording). QuickTime recordings aren’t easy to edit in post, but if you want a quick and easy recording method on MacOS, it’s one of the simplest.
Step 1: Launch QuickTime.
Step 2: Select “File” and choose “New Screen Recording.”
Step 3: To decide whether mouse clicks and sounds appear in your recording or not, click the small, white arrow and select the appropriate options from the drop-down menu.
Step 4: When ready, click the red record button.
Step 5: You’ll need to select what you want to record. To record the entire screen, click once anywhere. To record only a portion of it, click and drag a box and then click “Start Recording.”
Step 6: When finished, navigate to the menu bar and click the stop recording button designated by the square symbol. Alternatively, if you have one, tap the appropriate symbol on your Touch Bar.
Step 7: To save your recording, click “File,” then “Save,” and choose an appropriate save location and name for the recording.
MacOS screen recorder
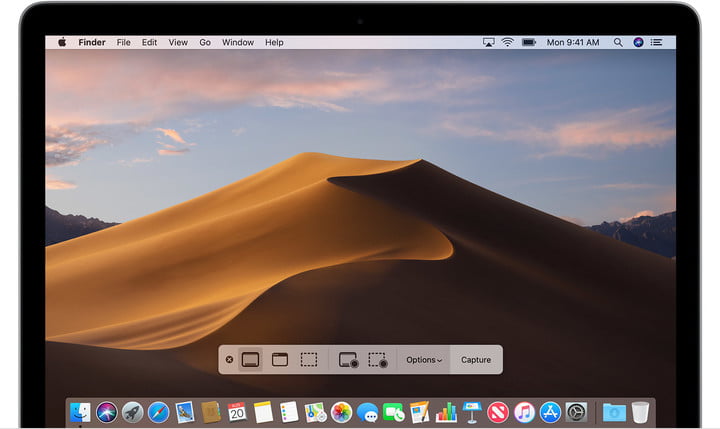
Introduced with the new developer beta of MacOS Mojave is a new feature allowing you to record video of your screen as well as take screenshots with the MacOS screen capture tool. If you’re running the latest version of MacOS, here’s how to do it.
Step 1: Press “Command” + “Shift” + “5” to bring up the screenshot toolbar.
Step 2: Decide whether you want to record your whole screen or just a portion of it and click the respective button. If you chose the latter, you will then need to select where you want to record, otherwise the recording will begin immediately.
Step 3: When you have recorded everything you want to, click the stop button to halt the recording.
Step 4: As part of the new version of MacOS, when a screenshot or recording is taken, they appear as a thumbnail in the bottom right-hand corner of the screen. Click it and choose a save location.